Super Easy* 2-Stage Git Deployment
*I explain what I mean by "easy" down in the Why? section.
Quickstart
I go into more detail below, but if you just want to see the whole thing in a screenful of text, here it is.
One-sentence summary: A bare Git repo on the server acts as an in-between for pushing and pulling updates.
Setup:
# Make the bare repo on the server:
deimos$ mkdir foo.git
deimos$ cd foo.git
deimos$ git init --bare

# Add the remote to your local dev repo and push it:
$ cat >> .git/config
[remote "deimos"]
    url = ssh://deimos/home/dave/foo.git
$ git push deimos

# Clone to the destination on the server:
deimos$ cd /var/www/htdocs
deimos$ git clone /home/dave/famsite.git
Usage (deployment):
# Push changes from development to the server
$ git push deimos

# On the server, pull to the destination
$ ssh deimos
deimos$ cd /var/www/htdocs/foo
deimos$ git pull
That’s it! If you’re not convinced, you can read my description and reasoning ("What?" and "Why?"), or skip all that and scroll down to details about the setup. Actually, you can do anything you want. You have my blessing to read as much or little of this page in whatever order you like.
Proper summary
Fully automated website deployment based on Git hooks may very well be easy to use, but this type of setup feels weirdly fragile and relies on too much of what feels like "hidden magic" for my taste. So I’ve settled on a semi-automated compromise that lets me deploy in two stages where I can see all of the moving parts:
-
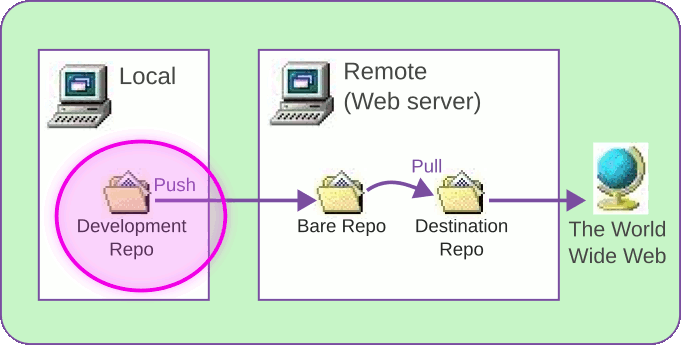
Stage 1: Push from my local development computer to a remote bare repo on the server.
-
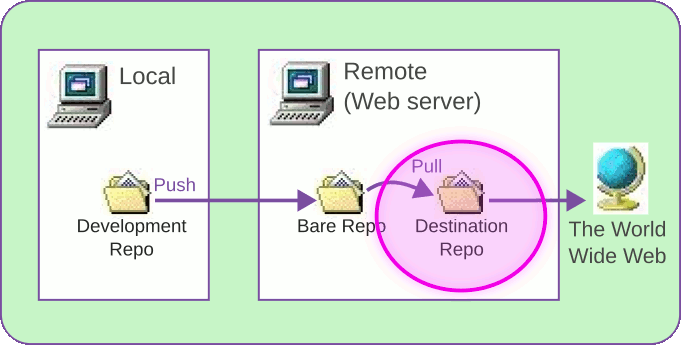
Stage 2: On the remote computer, pull from the bare repo to the destination repo so it can be served to the world.
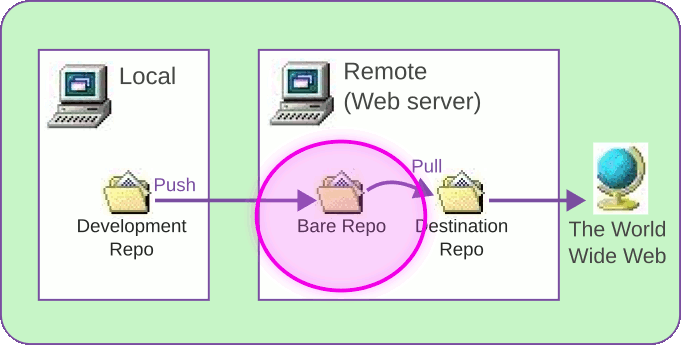
There are three (3) Git repos involved. I made this little diagram to show where they live.

As you can see, one repo is on your local development computer, and
the other two are on your remote server, where the content will
actually be served to the public. You push from the local repo to
the bare repo on the server, then pull from the bare repo to the
destination.
What?
First off, let’s be clear about what I’m deploying with this process: It’s
not for ratfactor.com content changes. (I’m still using rsync for that.
I make lots of little page updates far too frequently - sometimes to fix a
single misspelled word! - to be going through the whole Git process each time.)
Instead, this is for updates to the software that underlies specific website projects. For example, my Famsite mini social website and my HTML WARDen wiki (both written in PHP).
Let’s also be clear that this method is loaded with caveats, including:
-
The destination served by
httpd(or equivalent) is going to be an entire Git repo with the.gitdirectory, README, and everything. You have to be okay with that. -
Like the title says, deployment is in two stages. It’s not just a single "push and it’s live".
-
All of this makes sense to me, but other methods may be both easier and simpler for other folks.
The world is a complicated and messy place and one size does not fit all.
Why?
I’m so allergic to complexity in my personal projects that I won’t even touch anything that looks or smells like "big project" infrastructure. All that fully-automated CI/CD stuff is great, but setting those things up and maintaining them is literally more work than creating some of my smallest Web projects.
Having said that, I have been craving something slightly better than rsync
for deploying Web software updates.
The important thing to understand about this method is that I was balancing easy versus simple. These two concepts are perhaps best summed up by software developer Hajime Hoshi (hajimehoshi.com):
Easy: how quickly you can achieve what you want
Simple: how quickly you can understand the model
In my mind, this is "simple" because it’s just pushing and pulling with Git.
And it’s "easy" because I’m not updating my software all that often, so a
git push from my development computer, and then logging in to do the final
git pull to the live site is no big deal.
(In fact just between you and me, I like logging into the server. It’s nice to say, "Hi" with an in-person login. If I were Marie Kondo, I might take this opportunity to thank the computer for its service.)
Setup
Here’s what we’ll be doing:
-
Create a bare Git repo on the server to which you’ll deploy.
-
Add the new bare repo as a "remote" target for your local development repo.
-
Make the final destination repo on the server to pull from the bare repo.
Ready?
Setup Step 1: Make a bare repo on the remote computer
Let’s take the mystery out of this: A "bare" Git repo is the cornerstone to any "forge" or other central Git repository. But there’s nothing complex about it! It’s just the ".git" directory without a workspace. You don’t (in fact, can’t) do any development in a bare repo, you just clone from it, pull from it, or push to it.
By convention, a bare repo has ".git" in the directory name, like foo.git.
SSH into your remote server (in my case, a computer called "deimos") and make a bare repo like so:
$ ssh deimos
deimos$ mkdir foo.git
deimos$ cd foo.git
deimos$ git init --bare
I’m the only user on my server, so I just make mine in my home directory:
/home/dave/foo.git. That’s what you’ll see in the examples that follow.
Aside: Once I learned how simple and useful "bare" repos are, I find myself making them quite frequently. See more on my card: git-bare-repos.
Setup Step 2: Add the new bare remote to your local "dev" repo
Add this as a git push target with these two lines in your local repo’s
.git/config. Again, I’m going to be pushing to a server called "deimos":
[remote "deimos"]
    url = ssh://deimos/home/dave/foo.git
Note: I prefer to edit .git/config manually, but Git has commands for
adding remotes at the command line. Do whatever feels most comfortable.
Pushing to the remote by name ("deimos" in my case) should now be this easy:
$ git push deimos
You know it worked if Git responds with something like:
Enumerating objects: 149, done.
Counting objects: 100% (149/149), done.
...
 * [new branch]      main -> main
Setup Step 3: Create the destination repo on the remote
Lastly, we create the destination, the "live" directory actually being served
by the web server. My final destination will be /var/www/htdocs/foo/ for these
examples.
The easiest way to do this is to clone directly from the bare repo:
$ ssh deimos
deimos$ cd /var/www/htdocs
deimos$ git clone /home/dave/foo.git
If you do that, Git will setup the "origin" automatically and you’re done with this step!
But if you need to add it manually for some reason, here’s
what the [remote] portion of the config entry looks like:
deimos$ cat /var/www/htdocs/foo/.git/config
...
[remote "origin"]
	url = /home/dave/foo.git
	fetch = +refs/heads/*:refs/remotes/origin/*
That should be it for setup. Let’s see how this works in practice for an update.
Usage (deploying changes)
I already gave away the secret in the Quickstart.
"Stage 1" is to push your local changes to the bare repo on the server:
$ git push deimos
And "Stage 2" is to pull from the bare repo to your destination:
$ ssh deimos
deimos$ cd /var/www/htdocs/foo
deimos$ git pull
That’s it. One push and one pull.
Calling these steps "stages" is a bit much, but I didn’t want to brush away the fact that you need to manually SSH into the server halfway through the usage. Hopefully this makes it underwhelming when you read what’s actually involved versus what you’re expecting with the term "stage".
Bonus: Multiple destination servers
In practice, I’ve got a "staging" server in my hobby setup. The computer called "deimos" is running OpenBSD in my basement and another computer called "willard" is a VPS (Virtual Private Server) running OpenBSD hosted by OpenBSD.amsterdam.
Adding destination servers with this setup is very straightforward:
-
Do the server setup on however many servers you want.
-
Add the servers as named remotes in your local repo config.
Here’s what I added to my actual "famsite" project .git/config:
...
[remote "test"]
    url = ssh://deimos/home/dave/famsite.git
[remote "live"]
    url = ssh://willard/home/dave/famsite.git
...
If it’s helpful, here’s the entire .git/config for that repo:
[core]
	repositoryformatversion = 0
	filemode = true
	bare = false
	logallrefupdates = true
[remote "origin"]
	url = /home/dave/repos/famsite.git
	fetch = +refs/heads/*:refs/remotes/origin/*
[remote "test"]
    url = ssh://deimos/home/dave/famsite.git
[remote "live"]
    url = ssh://willard/home/dave/famsite.git
[branch "main"]
	remote = origin
	merge = refs/heads/main
Deploying changes to any of the three destinations looks like this:
$ git push       # default is "origin", a local bare repo
$ git push test  # pushes to "deimos"
$ git push live  # pushes to "willard"
(I describe using a local bare repo as an origin here: Personal Linux Setup with Git Repos and Stow.)
Good luck out there and I hope this was useful to somebody.
Back to partial-automation or git